
Setting up your legs
Look at one of your legs and notice the loop of lace at the very top. This is (obviously) the one that will be used to hang your legs from your belt. What is not so easy to see is our intended technique.
Step one - Setting up your arming belt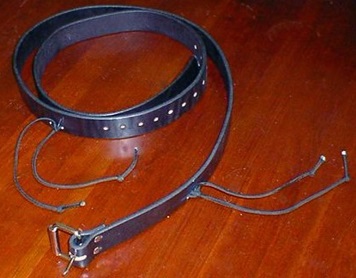
Here's a picture of a Dark Victory Arming belt, rigged out with laces to serve as arming points. Your belt will not have the laces installed even if you purchase it from us since we don't know where to punch the holes for your body style.
As you look at it, you'll see that the belt has two laces that have been attached to the belt. When you set up your own belt, these need to be punched through the leather at points directly above where your cuisse (thigh) loops will be. Once you've set up the belt with properly placed laces you'll be ready to attach and adjust the hanging height on the legs.
Step two - Hanging
Preferred means of attachment is to take one of the arming point laces (the one attached to the belt) and run it through the cuisse loop, then secure with a doubled bow tie.
Step three - Height
We'll want to make sure that the legs are hanging at the right height. By shortening the cuisse loop (tying a knot to keep it that length) you will raise the level at which the leg hangs. Naturally making the cuisse loop longer will lower where the leg hangs. The most important consideration in this alignment is to make sure that the knee plate matches the knee. The leg armor has to bend where the legs actually bends.
Tip: The lace at the back of the cuisse doesn’t need to be super tight when on the field. Just tight enough to keep ‘em from flopping around when you run.
Padding your legs
You'll want to use padding where people hit you and where you are particularly bony. For most people these two areas are the outside of the cuisse (hit) and the knee (bony).
Step one - Padding where they hit you
Our preferred technique for padding is to install vertical strips of 3/8"-1/2" closed cell foam (commonly available as camp mat for use under sleeping bags). We say vertical stripes because this allows some air to flow and keep you cooler in warm weather. On legs the most common point of impact is indeed the outside of the thigh. That's where you'll want to pad first. As you start using your armor you'll discover areas that you may wish to add more padding and others that require less. .
Step two - Padding the bony parts
Just about everyone knows that knees are off target in SCA fighting. However knees still get hit. When that swift sword plows into you, we're going to want to distribute the impact force. For many, kneepads are an excellent choice. In our experience at DVA we think that they are the best. But let's take that concept to the next level. Since there is elastic in the kneepad, we'd like to put it on double duty and help it keep your legs in place as you are fighting. So the preferred method of using kneepads with the armor is to attach them to both sides of the knee plate. We'll do that by removing the lacing that runs through the knee plate and then noting the two holes on each side of the knee plate. We'll want to burn corresponding hole through the side of the kneepad in order to lace them in. Burning those holes can be done with a soldering iron, or more commonly available, a nail that's been heated up to red while gripped by pliers. Careful... hot stuff can burn you too. Lace in the two sides of each knee and you now have a nice way to keep the legs where they need to be and padding them at the same time.
Check out our padding page for more of the Zen of padding.
In Closing
We can only give you so much advice without seeing you in person, so our information is general and should be thought of as a good start but not necessarily the last word. In all these matters, consult with your local marshals since they are often the more experienced and know how things should be protected. They are there for your safety and are eager to help
All right, I've blathered on long enough about tips and techniques. Get out there and fight!